



How to Integrate Proxies with Puppeteer for Page Requests

Hannah
To understand how to integrate proxies with Puppeteer, set the proxy server when launching the browser and handle authentication separately. For a browser-level proxy change after 1,000 page navigation requests, count the requests, close the browser, then relaunch it with the new proxy.
Proxy setup can seem simple until credentials, HTTPS pages, or rotation enter the picture. The key is to choose the right routing method for the task and account for how Puppeteer handles each connection.
This guide covers practical steps for configuring a proxy for a browser or page, authenticating it, routing selected requests when needed, and rotating proxies after a chosen request count. It also explains what to check when a connection fails, so you can build a setup that fits your automation workflow without unnecessary complexity.
Key Takeaways
- Set the proxy server when launching Puppeteer, and handle proxy credentials separately where the browser requires it.
- Choose browser-wide routing for consistent page traffic, or use request-level routing when only selected requests need a proxy.
- For rotation after 1,000 page navigation requests, count navigations, close the browser, and relaunch it with a different proxy.
- When a connection fails, check the proxy protocol and authentication response before changing your Puppeteer setup.
Proxy authentication
Configure the browser’s proxy server separately from its credentials, then test both before sending requests. Puppeteer’s launch settings route browser traffic, while authentication methods handle the username and password.
Configure the Proxy Server
Set the proxy endpoint with Chrome’s --proxy-server flag in puppeteer.launch. For example, use http://proxy-host:port for an HTTP proxy or socks5://proxy-host:port for SOCKS5. Match the scheme to the server’s protocol; a mismatch can prevent connections. Keep credentials out of the flag because Chrome and Chromium don’t support proxy URLs containing usernames and passwords.
Set Proxy Server Credentials
Launch the browser with the proxy flag, then call page.authenticate() before navigating. Supply the proxy’s username and password in the method’s credentials object. Set username to the account name and password to its matching secret. These are not the login details for the target website. Proxy authentication may require a different approach depending on the website and proxy setup.
- Check the response and connection.
Navigate only after setting credentials, then inspect errors. An HTTP 407 response typically means the proxy requires authentication, so review the username, password, and proxy access settings. If the browser cannot reach the server, test connectivity with cURL or telnet and confirm the address, port, and protocol. A reachable server can still reject invalid credentials.
- Verify the public IP and choose a proxy type.
Open httpbin.org/ip through Puppeteer and compare the reported address with the proxy’s IP. Residential proxies use residential IP addresses from different geographic locations; datacenter and mobile proxies are alternatives with different network sources. Choose based on the target site and task, then confirm that the observed IP matches the intended route.
- Apply the setup across environments responsibly.
On Linux, Windows, or Docker, pass the same launch argument to the Chromium process running in that environment. In Docker, ensure the browser process can reach the proxy server over its configured network. For authenticated proxies, proxy-chain can create a local proxy server on port 8000, which Puppeteer uses without placing credentials in Chrome’s proxy URL.
Before automating, review the target site’s robots.txt for scraping policies and pace requests to avoid sending too many too quickly from one IP. A proxy can hide your IP from the target, but cookies may still help the site monitor traffic. Follow applicable rules and the site’s access policies.
Benefits of proxies for headless browsing
Use a proxy when a headless Puppeteer browser needs a different network route. The right method depends on the target, the task, and whether requests need a consistent or changing IP address.
- Assign a suitable route to the browser. Choose a proxy type based on the traffic you need to send. Residential proxies use residential IP addresses from different geographic locations, which can help with location-specific access. For example, a browser checking how a page appears across regions can use a proxy in the relevant location. A proxy changes the route, not the browser’s headless setting.
- Keep repeated requests from relying on one IP address. A fixed route sends every page request through the same IP. Proxy rotation changes the IP address regularly, which can help mimic natural user behavior. For example, a data collection script can use a different proxy for each browser run. Set rotation according to the task, rather than changing routes without a clear reason.
- Choose between a random proxy and a planned sequence. A JavaScript script can select a random proxy from a list or iterate through the proxies sequentially. Random selection distributes browser runs across available routes; sequential selection makes the order predictable for debugging. For example, log the selected proxy alongside each run, then compare results if a route fails. Keep the proxy list aligned with the target’s access requirements.
- Separate browser identity from browser mode. Headless describes how Puppeteer runs the browser, while a proxy controls its network route. Puppeteer runs headless by default, but it can also run full Chrome or Chromium. For example, configure the same proxy server while testing a page in headless mode and then in a visible browser. This helps identify whether a problem comes from routing or browser behavior.
- Match the proxy choice to the work. For location-sensitive checks, choose a route that corresponds to the location being tested. For repeated automated collection, consider how rotation and request pacing fit the target site’s policies. A proxy doesn’t replace sensible automation controls. If residential routing suits the task, review residential proxy options as one possible fit.
Changing proxies after a set number of page requests
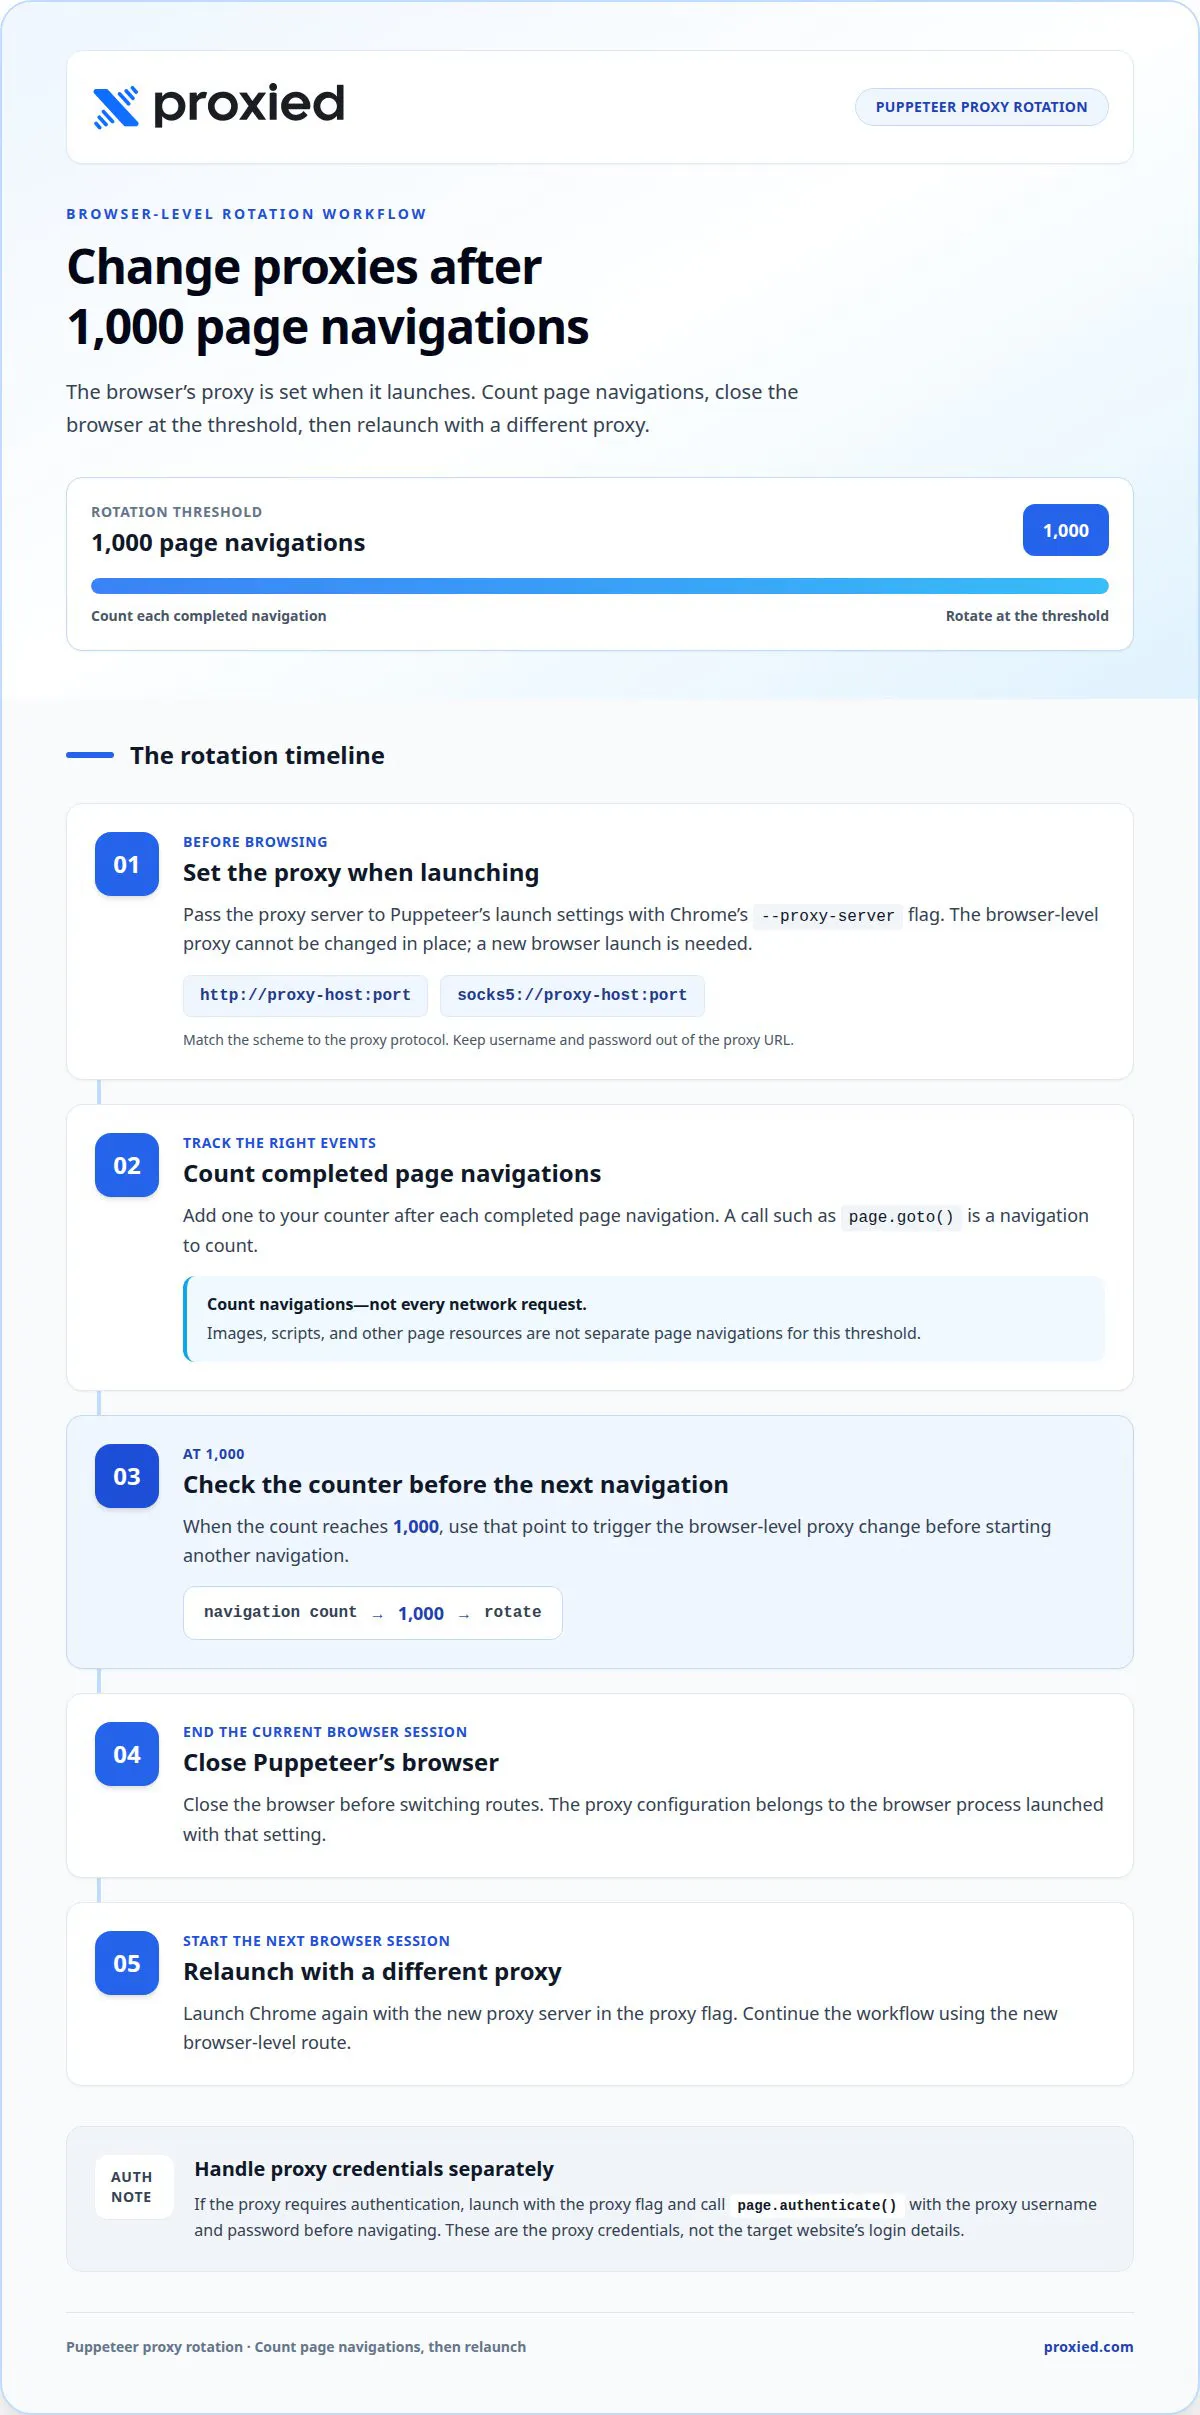
For a browser-level proxy change after 1,000 page navigation requests, count each navigation, close Puppeteer, then launch Chrome again with a new proxy server. This restart matters because the browser’s proxy is set at launch.
- Define the navigation threshold. Use 1000 as the count when your task requires a proxy change after 1,000 page navigation requests. Count calls that navigate the page, such as page.goto(), rather than assuming every image, script, or other resource request is a page navigation. This distinction keeps the rotation rule tied to the stated threshold.
- Keep a counter in your JavaScript workflow. Add one to the navigation count after each completed page navigation. Before starting another navigation, check whether the count has reached 1000. Keeping the check near the navigation call makes the rotation point visible and helps prevent the next page from using the old proxy server unintentionally.
- Close and relaunch Puppeteer at the threshold. The --proxy-server argument is passed when Puppeteer launches Chrome, so changing it requires a new browser process. A simplified control flow looks like this:
let browser;
let pageCount = 0;
let proxyIndex = 0;

async function startBrowser(proxy) {
  browser = await puppeteer.launch({
    args: [`--proxy-server=${proxy}`]
  });
}

await startBrowser(proxies[proxyIndex]);

// After each page.goto():
pageCount++;
if (pageCount === 1000) {
  await browser.close();
  proxyIndex = (proxyIndex + 1) % proxies.length;
  await startBrowser(proxies[proxyIndex]);
  pageCount = 0;
}
Place the navigation counter next to the actual page.goto() call. This makes the restart condition easier to review.
- Choose the next proxy deliberately. The example advances through a proxy list in sequence, then returns to its first entry. You can instead select a random proxy for each new browser run. Keep selection logic separate from the counter, so reaching 1,000 requests triggers rotation consistently, regardless of which proxy comes next.
- Finish work in progress before closing Chrome. Close the browser only after the current navigation and any required page processing are complete. Then launch a fresh browser with the replacement proxy server and reset the counter. For web scraping, this gives each browser session a clear proxy assignment and makes failures easier to trace to a specific run.
- Record each rotation event. Log the completed navigation count and selected proxy identifier when the browser restarts. If a page fails immediately after rotation, the record can help distinguish a proxy connection issue from a page-specific failure. Keep logs focused on operational details, and do not record proxy credentials.
Using proxies for whole pages or individual requests
Choose the routing scope according to whether the task needs one route for a page or different routes for selected requests. Puppeteer’s launch argument sets a browser-level proxy, while the puppeteer-proxy library can configure page-wide or request-specific routing. The right method depends on how to integrate proxies with Puppeteer in your workflow.
- Use a browser-level proxy for consistent page traffic. Add the proxy endpoint to Puppeteer’s --proxy-server argument when launching Chrome. For example, the argument can point to 127.0.0.1 on port 9876. This approach applies the browser’s proxy configuration broadly, so it suits scraping tasks where the page and its resources should use the same route.
- Choose request-level routing for selective traffic. Use puppeteer-proxy when only specific requests need a proxy or when different requests need different proxies. For example, a page could send its main document through one route and selected requests through another. This gives you more control than a single launch argument, but you must define which requests use each route.
- Make routing decisions explicit. To decide how to integrate proxies with Puppeteer, identify which requests need proxy access. A whole-page setup is easier to manage when all traffic follows one route. Request-level routing is more targeted, but each selected request needs a clear routing rule. This distinction helps prevent unintended differences between the page and its supporting resources.
- Configure credentials for the chosen scope. A proxy may require a username and password, but Chrome and Chromium do not support credentials embedded in proxy URLs. Handle authentication separately from the proxy-server argument. For request-specific routing, apply the credentials to the proxy handling that request rather than assuming browser-level settings cover every route.
- Select proxies consistently when using a list. A JavaScript script can choose a random proxy address with Math.random() or iterate through a list sequentially. Random selection varies the route between runs; sequential selection makes the order predictable. Keep selection logic separate from routing scope so you can tell whether a result changed because of the proxy or the request configuration.
- Test the selected route against the target. Start with one page and confirm that its requests use the intended proxy. Then test any requests routed separately. If the website behaves differently, narrow the test to one route and one request type. This helps isolate configuration issues without changing the entire scraping workflow at once.
Authenticating proxies with page.authenticate()
Call page.authenticate() with the proxy username and password before navigating. This keeps authentication in the Puppeteer script instead of embedding credentials in Chrome’s proxy argument.
- Create the page after launching the browser. Configure the proxy server at launch, then open a Puppeteer page for the task. Authentication is associated with that page, so apply it to each page that needs the same authenticated route. Do not assume a new page inherits another page’s authentication settings.
- Set credentials before requesting the target. Pass the proxy’s username and password to page.authenticate() before calling page.goto(). For example: await page.authenticate({ username: 'proxy-user', password: 'proxy-password' });. Replace both sample values with the credentials for your proxy. Do not put real credentials in public code repositories or diagnostic logs.
- Authenticate before navigation. A practical script order is to launch Chrome, create the page, authenticate it, and then navigate. Calling the method after a request starts can leave that request unauthenticated. Await the authentication call before opening the target website, then inspect the page response to confirm access.
- Update a changing proxy and its credentials together. With dynamic proxy rotation, the new endpoint may require a different username and password. Update the proxy configuration and matching credentials as one operation. If rotation changes the browser-level proxy, relaunch Chrome with the new endpoint, create a page, authenticate it, and then continue the script.
- Diagnose authentication failures precisely. An HTTP 407 response typically indicates that the proxy requires authentication. Confirm the endpoint and credentials belong together, then retry with a fresh page or browser session. If authentication succeeds but navigation still fails, test proxy connectivity separately; a valid password cannot fix an unreachable server or an incorrect protocol.
- Choose a proxy setup that fits your automation. A library can help manage proxy routing, while page.authenticate() provides a direct Puppeteer method for supplying credentials. Keep the script’s rotation logic clear, and avoid printing passwords while debugging. For an authenticated proxy workflow, explore proxy options suited to your Puppeteer setup.
Chrome and Chromium do not support proxy URLs containing usernames and passwords, so keep proxy authentication separate from the browser’s proxy address. A proxy-authentication Chrome extension is another approach; its example specifies manifest version 2. Choose the route that fits the browser setup, and keep the endpoint and credentials aligned when configuring it.
If a page has trouble loading through a proxy, increasing the timeout in the Puppeteer options may help. First test proxy connectivity and accessibility with tools such as cURL or telnet, then distinguish a route problem from an authentication problem. Before scraping a site, check its robots.txt file for its policies. These checks help identify whether the issue is reachability, loading time, credentials, or site policy, without exposing passwords during diagnosis. Keep proxy details out of logs, and ensure troubleshooting requests use the same route intended for the page.
Proxied
Proxied offers connectivity options for teams building Puppeteer workflows that need a proxy source or infrastructure management. Dedicated 4G and 5G Mobile Proxies can support automation tasks that call for mobile proxy connections, while the Proxied Hoster Dashboard supports hosting and scaling your own mobile proxy devices. The right fit depends on how your script routes traffic, handles authentication, and changes proxies between browser sessions. These offerings complement the setup steps in this guide; they don’t replace configuring Puppeteer’s proxy argument or authentication logic. If you’re planning a Puppeteer workflow and want to discuss how Proxied’s connectivity options fit, contact Proxied.
Build your next Puppeteer workflow with confidence
To decide how to integrate proxies with Puppeteer, match the setup to your workload. Consider whether your automation needs mobile connectivity, a consistent browser route, or infrastructure you can manage alongside your scripts. Clear requirements make it easier to choose a suitable setup without unnecessary complexity.
Proxied offers Dedicated 4G Mobile Proxies and Dedicated 5G Mobile Proxies for workflows that call for mobile proxy connectivity. Free Virtual Numbers for receiving SMS messages are also available, though they serve a different purpose from routing Puppeteer traffic. Keep the requirements of your browser automation at the center of your decision.
When you’re ready to discuss proxy support for your workflow, Contact Proxied about proxy support. Bring your routing and authentication needs into the conversation, then take the next step toward a setup that works for your project.
Frequently Asked Questions
How to launch Puppeteer with an HTTP or SOCKS proxy?
Pass the proxy endpoint to Puppeteer’s Chrome launch arguments, using the scheme that matches the proxy. For example, set --proxy-server=http://proxy-host:port for HTTP or --proxy-server=socks5://proxy-host:port for SOCKS5. A practical answer to how to integrate proxies with Puppeteer is to test one endpoint before running a larger task. If pages fail, check the endpoint, port, and protocol.
How to configure a proxy per page or browser context in Puppeteer?
Use a launch argument when every page in a browser should share one proxy. For different routes, the puppeteer-proxy library can configure routing for an entire page or selected requests. To decide how to integrate proxies with Puppeteer for separate tasks, first map which requests need each route. Do not assume a standard browser context can independently override the browser’s launch-level proxy.
How to use proxy rotation with Puppeteer?
Store proxy endpoints in a JavaScript array and select one for each browser run, randomly or sequentially. If Chrome receives its proxy through a launch argument, close the browser and relaunch it with the next endpoint to change the browser-wide route. For request-level rotation, use routing that supports individual requests. Log a proxy identifier, not credentials, to trace failures between runs.
How to handle proxy authentication and certificate errors in Puppeteer?
Provide the proxy username and password with page.authenticate() before navigating. An HTTP 407 response typically indicates that proxy authentication is required or needs attention. Treat TLS certificate errors separately because they concern certificate validation, not the proxy password. Avoid setting NODE_TLS_REJECT_UNAUTHORIZED to 0; that disables certificate verification and is insecure.
How to configure proxies with Puppeteer and Chrome launch arguments?
Add --proxy-server to the args array passed to puppeteer.launch(). Use a complete endpoint with the correct protocol, such as HTTP or SOCKS5. The setting applies to the launched Chrome browser, so changing it requires a new launch. Keep credentials out of the argument and configure authentication separately if the proxy requires a username and password.
What are common Puppeteer proxy errors and how do you troubleshoot them?
An HTTP 407 response points to proxy authentication; check the credentials and whether authentication runs before navigation. For connection failures, check the proxy host, port, protocol, and reachability with cURL or telnet. To separate routing problems from target-site issues, test a simple page through the same browser session and inspect its public IP. Change one setting at a time to isolate the cause.
What are the differences between residential, datacenter, and mobile proxies for Puppeteer?
Residential proxies use residential IP addresses from different geographic locations. Datacenter and mobile proxies are alternatives with different network sources; choose based on the target site and task.